First off, you need fondant. You can by some from Michaels or make your own. I made a marshmallow fondant that can be found here.
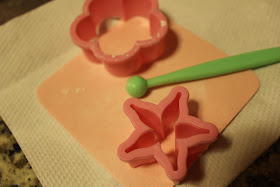
The only special tools you need are (picture below):
thin foam
2 cutters
and a ball tool
I read online that you need wires for the roses to dry on, but I just used toothpicks and a styrofoam block.
So lets begin making roses! They are quite simple.
1. Make small tear drop shapes fondant pieces and stick them on the toothpicks. Allow them to dry for an hour before moving on to step two.
2. Roll out the fondant as thin as you can. The thinner it is, the more realistic the flower looks. The fondant should almost be transparent. Cut out several pieces using the rose cutter.
3. Make five 1/4 inch long cuts in the rose at each petal. Place one of the pieces on the thin foam. Using the balling tool, with half the ball on the fondant and half on the foam, gently roll the edges of each piece so that it thins out the rose petals.
4. Poke the center of the rose piece with one of the toothpicks. Then wrap one of the petals around the teardrop.
5. Alternating between the petals, wrap the rest of the petals around the tear drop. Brush on a little water to help make it stick.
6. To make a bigger rose, add a second layer of rose petals to the rose bud just like above. Remember to use the ball tool again. Alternate between petals again.
7. To make a full bloom rose, add another layer, for a total of three layers.
8. Roll out some green fondant and use the second cutter. Using the balling tool with thin foam, roll from the edge to the center of each piece.
9. Hold the flower upside down, push the green piece through the center on to the toothpick. Slide it all the way down to the flower, apply some water to attach.
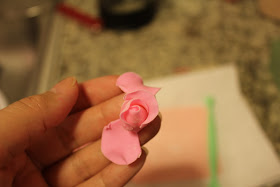
These are what a rose bud, rose, and full bloom rose looks like:
I hope this tutorial helps you make beautiful roses too!


They are beautiful! Thank you so much for sharing this! I can't wait to make some!
ReplyDeleteWowo thankyou so much for sharing how to make these, they look so perfect,
ReplyDeleteGreat tutorial, Your roses are beautiful!
ReplyDeleteSo pretty! Do you take them off of the toothpick? Or just insert it into the cake?
ReplyDeleteHi CrIsweetie,
ReplyDeleteI honestly just stab the toothpicks into the cakes. I never tried taking them off in fear of breaking the petals after they dry.
Thanks for master class. Your roses are beautiful.
ReplyDeleteThey look great! Better than other I've seen online. How long can they keep for? And how would you store them?
ReplyDeleteHi Bella! I always make these roses a day before I need them on a project. They are fragile, so I like to leave them on the toothpicks in the styrofoam block until I need them, which is usually the next day. Then I pull the toothpicks out carefully, and glue them on the cake with royal icing, etc.
ReplyDeleteI had extra roses before. I leave them in tupperware boxes with soft foam or bubble wrap on each layer. I store them at room temperature. I used them 2 months later, and they were still yummy. So I am not sure how long they can stay. My guess is forever, like royal icing lay-ons.
Thank you very much for sharing this tutorial. Your roses looks amazing! Thanks thanks thanks, a million thanks! This will help me out as a beginner.
ReplyDeleteThis comment has been removed by a blog administrator.
ReplyDeleteI think I could cry right now! I'm a Pastry Chef that sadly could never make these. My focus is restaurants but I've always had a love for cakes. Thank you thank you thank you!
ReplyDeleteThank you so much for sharing . The step by step pics are great.
ReplyDeleteThe roses look awesome and you did great ... question, are the petals all from the same size cutter because it looks as though they are different sizes? Little help please :)
ReplyDeleteCristina
@Anonymous Hi! For a single rose, I use the same cutter. I just use my balling tool more on the outer petals. If I want a smaller rose, then I use a smaller cutter. I dont switch between sizes when making a single rose. Hope this helps.
ReplyDeleteThanks so much for this privilege. God bless you. Can't wait to try mine.
ReplyDeleteWhere did you get the cutters-I love your roses! Want to try these.
ReplyDelete@Anonymous
ReplyDeleteHi. The cutters are made by Wilton. You can probably get them online. I've also seen them at my local Michael's Craft store. It's called the "Stepsaving Rose Bouquet Flower Cutter Set" Hope this helps.
Wow!!!! This is so easy. You have saved the wedding day.
ReplyDeleteTHANKS
Great! We will be connecting to this enormous post on our site. Continue the good writing. Cosmetic Dentist reseda
ReplyDeleteBest tutorial I have ever found!!! Beautiful. Thank you so much.
ReplyDeleteI've got all the stuff to give marshmallow fondant a try!
ReplyDeleteThere are certainly a variety of particulars like that to take into consideration. That is a nice level to bring up. I supply the thoughts above as normal inspiration however clearly there are questions like the one you deliver up where an important factor shall be working in honest good faith. I don?t know if finest practices have emerged round things like that, but I am sure that your job is clearly identified as a good game. Each boys and girls feel the affect of just a moment’s pleasure, for the remainder of their lives. betfair online casino
ReplyDelete